Kitchen Fitters & Bathroom Installers in London

Kitchen Fitters & Bathroom Installers in London

Laying sheet vinyl

Sheet vinyl is a practical, hard-wearing flooring material which only needs to be swept, washed and occasionally polished to keep it in condition. It is therefore suitable for rooms where there are likely to be spills and water splashes, for example bathrooms and kitchens.

Buying vinyl
Vinyl is available in a variety of colours, patterns and effects such as ceramic tiles, cork, natural stone and timber and surfaces are both smooth and textured. Cushioned vinyl, which has a layer of foam material between the vinyl and the backing, is quieter, warmer and more comfortable than uncushioned vinyl and is particularly suitable in the kitchen, where you may spend time standing.

Estimating quantity
Most vinyl flooring comes in 2m widths; it is also available in 4m widths, which may eliminate the need for joins. If the room is wider than that, you will have to cut the vinyl into suitable lengths and join them. Remember to allow an extra 75mm for each length. Manufacturers will normally state pattern repeats for the material, so when you are matching patterns you will be able to estimate how much extra is needed. Usually you should allow for an extra pattern repeat on each length except the first. Most suppliers will give you a free estimate on the quantity needed if you submit a floor plan before ordering the material.

Preparing the sub-floor
Vinyl can be laid on almost any floor provided the surface is smooth, level, dry, clean and free from polish or grease – and of sound construction.

Solid floor
A solid floor should incorporate a damp proof membrane; if it does not, this is a good opportunity to have one installed and thus save problems later on. Fill any cracks or holes in the floor with a levelling compound which should also be used to level off a slightly sloping floor. To fix sheets of plywood or hardboard you must drill and plug holes and secure with countersunk screws.

Timber floor
Check there is adequate ventilation below the floorboards; installation of air bricks will solve problems in this area. Secure any loose boards and punch down protruding nail heads. If the floor is uneven, plane down any projections. Always lay hardboard sheets rough side up and fix them to the floor with ring shank or serrated nails at 100mm intervals. The rough surface enables the nail heads to be well bedded in and provides a better key for the adhesive. Hardboard has a low moisture content and if it absorbs any moisture it will expand; when it dries out, it will then shrink. You should wet the hardboard with water, using a dampened sponge, at least 48 hours before laying it. When it dries out, it will grip tightly around the nail heads. For a very uneven floor, screw down 12 or 18mm flooring grade chipboard at 300mm intervals, using countersunk screws, to provide a level surface. Alternatively, if the boards are severely warped, rotten or otherwise damaged, it is worth removing them and laying a new floor to avoid trouble later.

Laying Vinyl tiles

Preparing the surface
Thorough preparation of the fixing surface is essential for good results. Make sure it is clean, dry and level so the tiles lie perfectly flat.

If your fixing surface is slightly uneven, first cover it with plywood or tempered hardboard, smooth side up. You can use hardboard nails if fixing to a timber floor, but with concrete you will have to drill holes, insert suitable plugs and fix the hardboard into position with countersunk screws, making sure the screw heads lie flush with or slightly below the surface.
If the fixing surface is very uneven, cover it with 12 or l8mm chipboard or plywood screwed into position. Use flooring grade chipboard when fixing to timber, and resin-bonded plywood for concrete. On an old, worn, uneven concrete floor you may need to use a levelling compound. When mixed with water the compound finds its own level and provides a smooth, even surface.

Laying the tiles
Start laying tiles from the centre of the room, which can be located by stretching two lengths of string (preferably chalked) from the mid-point of each pair of opposite walls across the floor so they cross at the centre. Make sure the pieces of string cross at right-angles and secure the ends with nails or pins. Position two rows of dry tiles, working from the mid-point to the skirting boards .

This will give you the width of the tiles around the perimeter. If only a very narrow strip is left, the floor will have an unbalanced look, especially if you are using vinyl tiles in a dual colour or chess board design. To prevent this, adjust the string line half a tile width off centre to leave wider perimeter tiles. If using chalked string, pluck it and the chalk will leave an accurate impression on the floor. Alternatively, use a straight-edge and a pencil to trace the string lines accurately.

Complete each section of the room with as many full tiles as possible, leaving all cutting jobs until later. If using tiles that are not self-adhesive, spread a thin layer of adhesive on the floor (not on the back of the tile) about a square metre (or square yard) at a time. Don’t spread more than this because the adhesive sets quickly and the tiles must be laid while it is still tacky. Start laying the tiles, pressing each one firmly into position from the centre of the tile outwards to prevent air being trapped underneath.

Vinyl tiles

Vinyl tiles are ideal as floor coverings in different areas of the home and offer a wide range of colours and designs. Using the correct methods, these tiles are quite straightforward to put down, as long as you ensure the surface on which they are laid is dry, firm and level.

One of the real advantages of tiles rather than sheet flooring material is that, when laying, you can deal with awkward shapes one by one and any mistakes in cutting will be confined to individual tiles; you may even be able to reshape those cut in error and put them elsewhere. A mistake in cutting sheet material could involve much greater wastage. Vinyl and cork flooring come in tile form: vinyl is waterproof, resistant to oil, grease and most domestic chemicals; cork is non-slip, has good thermal insulation and reduces noise.

Vinyl tiles
These offer a wide choice of designs, from alternate rows in two or more colours and chess board effects to more complicated diamond patterns or squares-within-squares using a variety of colours. If you choose a complicated pattern, draw the design on paper to make laying easier – some manufacturers provide blank squared paper for this purpose. Vinyl tiles are sold in packs sufficient to cover a square metre (or square yard) and the most common size tile is 300mm square.

Always buy a few extra tiles since, apart from cutting mistakes, spares can be useful later on when worn tiles need replacing. Pure vinyl tiles are supple and easy to lay. They have a smooth gloss finish and come in a wide variety of patterns and colours. Most vinyl tiles are self-adhesive; if wrongly placed, these can be removed immediately and repositioned but, if you move them more than once, the adhesive tends to become less effective. Self-adhesive tiles are protected by a paper backing and you should always cut the tiles to shape before you remove this. If the tiles you choose are not self-adhesive, fix them with special vinyl flooring adhesive.

Looking after tiles
To maintain the surface of vinyl , clean them periodically with a mop or sponge and a little mild, liquid detergent. Never use excessive water, strong cleaning agents or abrasives which might damage the finish. Use white spirit to remove stubborn marks from rubber-soled shoes and, should the vinyl become scratched, apply an emulsion wax polish. Prevent spirit-based polishes, rubber compounds and nail varnish remover coming into contact with the surface since these could cause permanent damage to the vinyl.

Grouting floor tiles

When all the tiles have been fixed, leave them for at least 12 hours before grouting. Don’t walk on them during this time since any disturbance may affect the bonding of the adhesive. If you used card or matchsticks for spacing, remove them after 24 hours. It is a good idea to wait for 24-48 hours before grouting. Most tile manufacturers recommend a powder grout which has to be mixed with water to a creamy consistency. Mix only enough to last for about 40 minutes since it becomes unworkable after that time.
marble floor tiles
Cover a small area at a time and rub the grout into the joints with a sponge or the straight side of a notched spreader, making sure all joints are filled. Leave the grout to harden in the joints for about 30 minutes before wiping off the surplus with a dampened cloth. Wipe away all traces of grout from the tiles, rinsing frequently with clean water. You can blend the grout with the tiles by colouring it: mix grout colour mix with the grout powder before adding water. Try to avoid washing the floor for a week or two, since water may dilute the adhesive and affect the strength of the bond.

Laying ceramic floor tiles

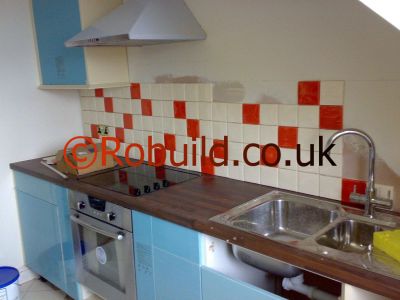
Traditionally ceramic tiles have been used to cover areas around basins, baths and sinks, where splashing is likely to occur. But they are also very practical for covering floors. Now that central heating has taken the chill from ceramic floor tiles, people are beginning to appreciate their hard-wearing qualities and easy maintenance. Provided it is correctly laid on a properly prepared sub-floor, ceramic flooring has good resistance to impact and general wear and high resistance to crazing. It only needs to be swept regularly and washed from time to time with water and detergent. Stubborn stains can be removed from this type of tile with a household abrasive or paint brush cleaner.

ceramic bathroom floor tiles

Types of tiles
It is essential to use only flooring grade tiles – wall tiles are much thinner and would break under pressure. Flooring tiles are available glazed or unglazed. Glazed tiles come in a wide range of colours and patterns and some have a roughened glaze to make them slip-resistant. Unglazed tiles are produced only in plain or mottled colours; but they are the most durable form of tile and are available in a range of anti-slip surfaces and also coving tiles to provide a clean curve from floor to wall. They are more difficult to cut than glazed tiles, but you can hire or buy a special tool for cutting them. Tiles are made in a variety of shapes, square ones being the easiest to lay. Always buy six or so extra ones for cutting in or in case of breakages. Mosaic tiles are small squares of glazed or unglazed ceramic covered with peel-off sheets 305mm square which you remove alter laying.

Preparing the surface
It is essential to lay ceramic tiles on a clean, dry, level surface; any distortions may cause the tiles to move and crack under pressure. They can be laid on a solid floor of concrete or existing hard flooring such as terrazzo or quarry tiles or on a suspended timber floor. But in each case the floor needs some preparation before the tiles are laid.

Concrete
The concrete must be dry, clean and flat. Tiling will not cure damp, so if the concrete is letting moisture through, 1ay a damp proof membrane and screed. Fill any small depressions in the concrete with sand and cement, using a mixture of three parts washed sharp sand and one part cement and make sure you level off after filling. If there is a slight fall-away in the surface in any direction, correct it with a concrete levelling compound. A badly depressed surface should be levelled with a waterproof screed. Chip away any small nibs of concrete and sweep the surface thoroughly.

Hard flooring
Tiled or terrazzo floors should be flat and firmly fixed. Remove any traces of grease or polish and make sure it is dry before you start tiling. Any loose sections, such as a loose quarry tile, should be securely glued back in place.
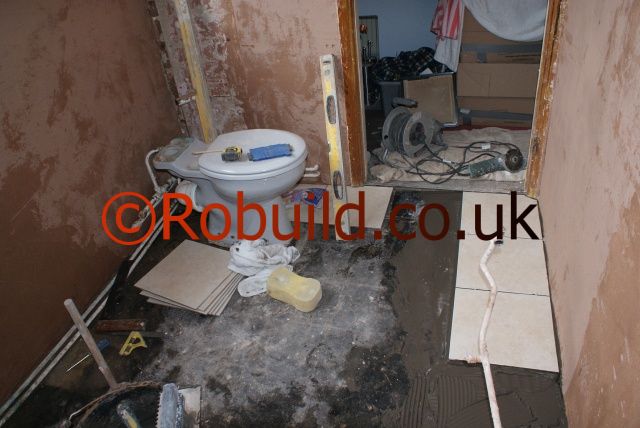
Timber floor
Make sure there is adequate ventilation below the floorboards to prevent rot forming alter tiling. Don’t lay tiles directly onto a suspended timber floor made of tongued and grooved boards since the movement of the floor would cause the tiles to shift and crack. Make the floor more stable by covering it with sheets of plywood at least l2mm thick, fixed at 300mm intervals with countersunk screws. If the floor is likely to be splashed with water, such as in a shower area, use exterior grade plywood. When all existing floorboards have to be removed, due to rot for example, you can screw flooring grade chipboard directly to the joists and lay tiles on this. Use screws for fixing sheet flooring since nails cannot be relied on to hold the material securely in place once the tiles have been bonded to them. Make sure the panels butt closely together; if any small gaps do appear, pack them tightly with a filler or the floor tiles may crack along the joint lines due to movement on the sub-floor. Before laying tiles over plywood or chipboard, always brush the surface with a priming coat; most manufacturers recommend a water-based polymer for this purpose. The primer must be properly dry before you begin tiling, so leave it overnight.

bathroom floor tiles

Working with adhesive
Manufacturers recommend a cement-based powder adhesive which can be used as a thin or thick-bed adhesive. Use a thin bed of about 3mm for flat-backed tiles; if the tiles have studs on the back or there is a slight unevenness in the floor (test with a straight-edge), use a thick bed of about 6mm. For thin-bed fixing, you will need about 3.5kg of adhesive per square metre.

Allow double this quantity for a thick bed. There is also a bitumen-based adhesive which can be used for thin-bed fixing. Cement-based adhesive can be used on concrete or timber floors, but it is not suitable on concrete which has not fully dried out or on ground floors which are affected by damp. In these cases, and for areas subjected to prolonged soaking with water (such as shower floors) use a waterproof adhesive. Always mix the adhesive according to the manufacturer’s instructions.

Setting out the tiles
The best way to set out tiles is from the centre of the room so you have an even border all round the edge. To find the centre, mark the halfway point on the two pairs of opposite walls and stretch a piece of string (preferably chalked) between each set of marks. Ensure the strings cross at right-angles and secure the ends with nails or pins. If the strings are chalked, pluck them to leave marks on the floor. Before fixing down any tiles, try out the layout with dry tiles. Lay one row of tiles in each direction from the point where the strings cross. If the space remaining at the end of a row is less than half a tile, adjust the string lines half a tile off centre to give a bigger space for the perimeter tiles. This will give a balanced border and avoids having to cut narrow pieces of tile. Check the door will open over the laid tiles; if not, remove the door and trim the bottom edge with a block plane.

Fixing the tiles
Tile one quarter of the room at a time, starting with the section furthest from the door and finishing at the door. Starting from the centre, spread the adhesive evenly over the floor with a notched spreader, which is often supplied with the adhesive. Don’t cover more than 1sq at a time. Place the tiles in position, starting in the angle of the chalked lines. Don’t slide them into place or adhesive will build up against the front edge of the tile. When laying studded tiles on thick-bed adhesive, spread a thin layer of adhesive on the back of the tile to ensure a solid bed when it comes into contact with the adhesive on the floor. Most tiles have spacer lugs to ensure the distance between each one is correct; if yours do not have these, place pieces of card or matchsticks between the tiles to give a space of 3mm. Remove any adhesive that oozes up between the joints (to leave space for grouting) and clean off any adhesive on the tiles before it sets. Tile each section of the room in turn, leaving the border until last. If you need to kneel on the tiled area while working, place a board across it to avoid damaging or disturbing the tiles.

Cutting border tiles
To cut a tile for the border, lay it face down on top of the last whole tile and slide it forward so the front edge butts against the wall. Mark the back of the tile at each side where the edge of the last tile finishes. Place it on a firm, flat surface and join up the two marks, using a straightedge as a guide. Score and cut the tile along this line with a tile cutter. The front section of the cut tile will fit neatly in the gap.

Cutting corner tiles
Place a new tile face down over the last whole one near the corner. Place a second tile on it, slide it flush to the wall and mark its edge on the tile below. Then move the marked tile to the last whole tile round the corner without turning it. Place the second tile over it, butt it against the wall and mark as before. Score and cut along these lines and nibble the corner away with pincers or tile nippers to give an L-shaped tile which will fit round the corner. Take away only very sma1l pieces at a time; if you try to cut too much at once, you may break the tile. When you have cut the shape you want, smooth the rough edge with a carborundum stone.

Cutting shapes
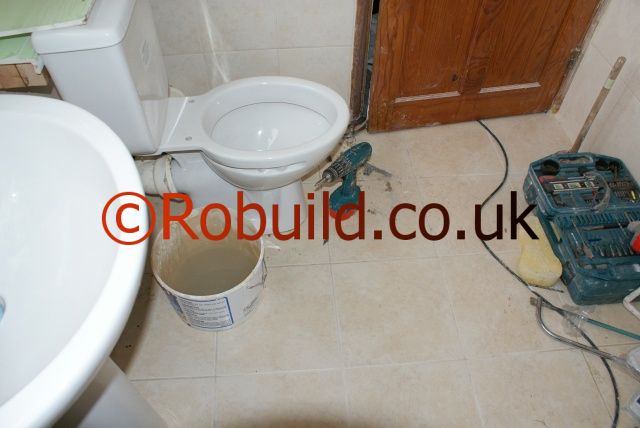
To cut curved shapes, use a contour tracer or make a template and scribe the outline onto the tile. Then nibble away the tile with pincers or tile nippers as before. To fit a tile round a pipe, cut the tile in two where the pipe falls, cut out a semi-circle from each piece and fit them round the pipe. When tiling round a WC or wash-basin pedestal, lay full tiles as far as possible round the pedestal. To avoid having to cut very narrow sections you may have to adjust the layout when setting out the loose tiles. Cut a template for each tile, using a contour tracer to mark the curve and with this cut the tile; lay it in place before making a template for the adjacent tile. When all the tiles are cut and smoothed, fix them in position. Remember to leave enough space between tiles and pedestal for grouting.

Mirror tiles

The simplest method of providing a large mirrored area is to fix mirror tiles. These are made in two thicknesses 3mm and 4mm and are available in a wide range of sizes. The quality is superior in the thicker 4mm tile and it might prove a false economy to buy the thinner version, since the surface of the glass is more inclined to flake. Each tile has self-adhesive tabs stuck to the back; once the protective paper is removed from the tabs, fixing is simple and instant. Before you start fixing, you must prepare the surface onto which the tiles are to be stuck. Any surface which is not perfectly flat will cause the tiles to lie in an uneven plane, which will result in a distorted reflection. Plaster surfaces are particularly bad since they are seldom perfectly flat. Although the tabs will stick effectively to painted or untreated plaster unless the paint is badly flaking – it is advisable not to try it if a perfect surface is required.

Fixing to board
Mirror tiles are best stuck down to a suitable board such as plywood or chipboard. The thicker the board the better, since there is more chance of achieving the perfect flatness you require. For a really uneven wall surface use an 18mm thick board; don’t use board less than l2mm thick, even on a wall which looks true. Screw the board in place using the appropriate wall plugs and countersink the heads of the screws slightly below the surface of the board. The screws should be about 450mm apart around the edge and across the surface of the board. Don’t drive the screws in tight, but stop just as the screw begins to bite into the board; an over-tightened screw in a depressed part of the wall will cause the board to follow the depression and lose its flatness. This is more likely to occur with thinner board.

Setting out tiles
This is an important stage and should be done with care. Individual tiles are seldom cut with perfect accuracy and can vary slightly. Over a large area this variation can be cumulative and result in a poor finish. Wherever possible set out the tiles loosely on the fixing board before it is screwed to the wall; you will finally fix them into place starting at the bottom and working upwards. When the tiles are set out squarely to your liking, number each tile, using a small piece of adhesive tape on the face of each, and write these numbers in the same order on the board. Fix the tiles in place so the numbers correspond. Fix them into place in the same order and you will be sure of a perfect run of joints.

Fixing tiles
When fixing take care to note the exact position of each tab on the back of the tile. Remove the protective paper and place the tile in position on the board, applying light pressure to each tab in turn. Avoid applying pressure to the tile between the tab positions especially when using thinner tiles – since this might break them. If you make a mistake and have to remove a tile, use a thin broad bladed knife and try to slide it beneath each pad in turn. Don’t try to lever the tile away or you will break it. New adhesive tabs can be stuck into place on the back of a mirror tile if the original one has to be removed. These tabs have strong adhesive and work effectively the first time on most surfaces. As a safeguard on porous boards, brush away any dust and apply a thin coat of impact adhesive to correspond with the tab positions. Allow this to dry thoroughly before bringing tabs into contact.

Care must be taken in areas where there is excessive moisture; bathrooms are particularly prone to heavy condensation. Never use a porous type chipboard as a backing for mirrors or mirror tiles in these conditions, since rot will set into the chipboard, causing mould and damaging the silvering of the mirror. Use a resin-bonded plywood and check edges are thoroughly sealed with primer.

An air space of at least 3mm ({in) should be left between the flxing surface and the back of the mirror; with tiles the tabs determine the space.

Cutting tiles

The most common tile cutter looks like a pencil and has a tungsten carbide tip to score the tile. To snap cleanly, place a matchstick under the scored line and press down evenly on both sides of the tile. A neat break should result.

tiler cutting tiles

The tile cutter scores with a cutting wheel. Place the tile in the jaws of the tool and gently squeeze the handles, pincer-fashion, to make a clean break. To mark an end tile for cutting to size, place it in position (front surface against wall) making sure one edge of the tile butts into the wall. Measure the distance from the end of the wall to the preceding tile in the row. Mark the width required in pencil, first on the reverse, continuing round the edges to the front face when you have turned the tile round. To join up these lines correctly place the tile face up on a firm, flat surface and using a metal straightedge (your try square is ideal) align the two pencil marks and score through the glaze with your cutter. Use one of the two cutting methods described. If really thin sections, less than 10mm thick, have to be cut, score deeply along the marked line and with pincers nibble away gradually at the waste portion. Never be tempted to take off a huge chunk in this way as the tile will break. Use this method, too, when cutting out L-shaped or curved sections. Make a card template (pattern) of the shape required and transfer it onto the tile. Projecting pipes are tricky to tile around so use a template again. The safest way to tackle the job is to cut the tile in two, removing from each portion an arc to suit the shape of the pipe. When the two portions are positioned together round the pipe, the joint will not be obvious.

Grouting between the tiles

Carefully mix your chosen grouting powder with water to a creamy consistency and rub well into the joints with a dampened sponge. Remove any surplus with a dampened cloth before the grouting is dry. Any remaining traces can be polished off later with a soft dry cloth. For extra colour you can add a dye solution to a ready-mix grout, or dye powder to a dry grout. Colours available include red, yellow, blue, green, brown and black.

kitchen tiles grouting