In a tiny kitchen, every inch counts. Room for food preparation, cooking, washing up and storage is at a premium but too often such kitchens are badly designed, lacking storage space and with a thoughtless choice and siting of kitchen equipment. This can be infuriating for the housewife who spends much of her day there. With a little planning, however, a tiny kitchen can be made as pleasant to work in as any other kitchen.

Ideally, to make really efficient use of limited space you should start re-planning the room from scratch. Take a long look at what is already in the kitchen and the type of equipment you have there and you will probably find that much of the space is wasted. A hotchpotch of different-sized storage cupboards, for example, is a great space-waster. An old sink will have very little room below it for storage. A central table in a small kitchen will make traffic jams almost a certainty.
Planning the Kitchen layout

With space at a premium in your kitchen, it is essential that you plan the room thoroughly. The best way to do this is to use a kitchen design software or make a scale drawing of the floor plan of your kitchen on a sheet of graph paper. Mark on it any architectural details plumbing, electrical points, windows, the door and the way it opens.
Next, cut out coloured pieces of card and mark them to represent the cooker, fridge, sink, cupboards and any other units. Lay these down on the plan and move them about to find the most efficient kitchen arrangement. Once you start doing this it will be easy to visualise how,everything can be fitted in, and how to save space.
Basic design
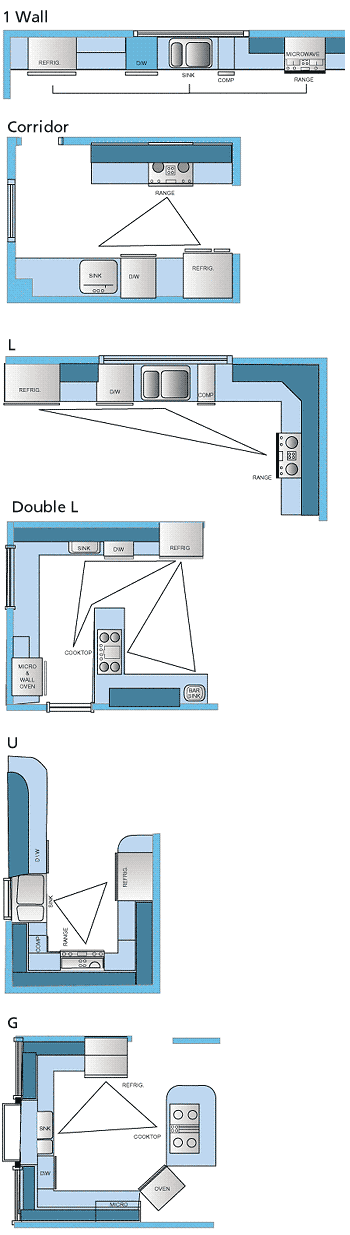
You will gain many ideas from working with your plan, but remember that there are basic design rules for kitchens, however large or small. There are three basic shapes for a kitchen plan-I, U and L shapes. Decide which one is right for your kitchen and fit in the units accordingly.

An I-shaped arrangement is best for really cramped kitchens in passages and very narrow, rooms. In this type of kitchen, all the equipment and storage can be down one side of the room or right in front of you, making a neat and efficient line.

An L-shaped arrangement is good for a rectangular room, or for part of a multipurpose room where the kitchen can be slotted into one corner. The L-shape can either be fitted neatly around the corner or, if space permits, one ‘arm’ can be left jutting into the room to act as a serving place or eating bar. But this arrangement is more suitable for reasonably big rooms.

A U-shape can be used in square kitchens and is often best in a confined space because the equipment can be ‘wrapped’ around the cook, who stands in the centre and has everything well within reach.
Work areas in the kitchen
Kitchen space must be divided into 4 work areas-preparation, cooking, serving and washing up even if there is a dishwasher. Within the framework of the I, U, or L shape, arrange these work areas in a natural progression, so that you don’t have to keep doubling back on your tracks when working in the kitchen. For example, you should place the fridge, food storage cupboards and mixer in the food preparation area. Keep pans over or under the sink as they usually need water in them before being put on the stove.
In a tiny kitchen, it is essential that there is a storage place for everything. Items that can’t be stored will simply be left cluttering valuable work surfaces. So plan your kitchen to the smallest detail to allow as much working space as possible to be left permanently free. When you have planned your kitchen to your satisfaction, you can start fitting in equipment and storage units to suit the work areas.
Units and Cabinets
You can save a great deal of space by using every inch of wall space from floor to ceiling for storage cupboards. The base units, the tops of which provide a work surface, should all have sliding doors. These take up a lot less room than I- hinged doors. Base units should stand on a recessed plinth. This will not only make unsightly scuff marks less conspicuous, but will also increase the kitchen floor area slightly, allowing you to work more comfortably as you can get your toe s under the working surface. One problem with base units is that manufacturers standard sizes will rarely fit snugly into a tiny kitchen.
You can build cupboards to your own sizes, or you can use open shelves, cheaper for someone on a small budget to bridge gaps between units. The top shelf should be level with the other work surfaces. Corner units are particularly important as there is often wasted storage space here in badly designed kitchens. Corner cupboards with plenty of shelves will gain valuable space.
Over the base unit, shallow midway units, about l00mm and l52mm deep will give ample space for jars or tins of food, but leave plenty of working room underneath. Over these units, hanging cupboards can run right up to the ceiling.
Kitchen Sink
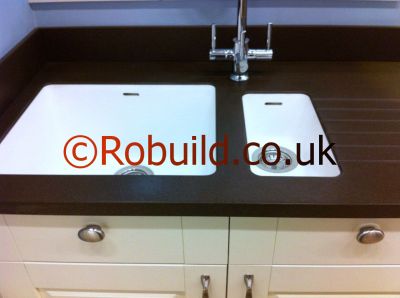
A modern stainless steel sink is shallower and therefore less space-consuming than the old-fashioned ceramic sink. If the sink is set into a work-top you can save a lot of space. Draining racks can be set on either side of the recessed sink hung on the wall behind it or placed on a tiled window sill over it. Even in a tiny kitchen don’t stint on the size of the sink as this is one of the items in most constant demand in a kitchen. If you have a large family a double sink is well worth considering even in the smallest kitchen. It speeds up washing up, and has many other uses.
Waste disposal in the kitchen
A waste disposal unit will take up far less space than a waste bin, though a cheaper and equally space-saving alternative is a rubbish chute set into the wall near the sink. Rubbish can be ‘posted’ through a trapdoor on the kitchen side and falls straight down into a dustbin outside. There should be a hinged flap on the outside wall to prevent draughts and the walls of the chute should be tiled to permit easy cleaning.
Kitchen Cookers
A split-level cooker takes up more space than an ordinary cooker unless it is carefully placed. If you can find room for this arrangement however, the hob and the oven don’t need to be next door to each other. This is useful if, for example, yon can make use of an old fireplace.
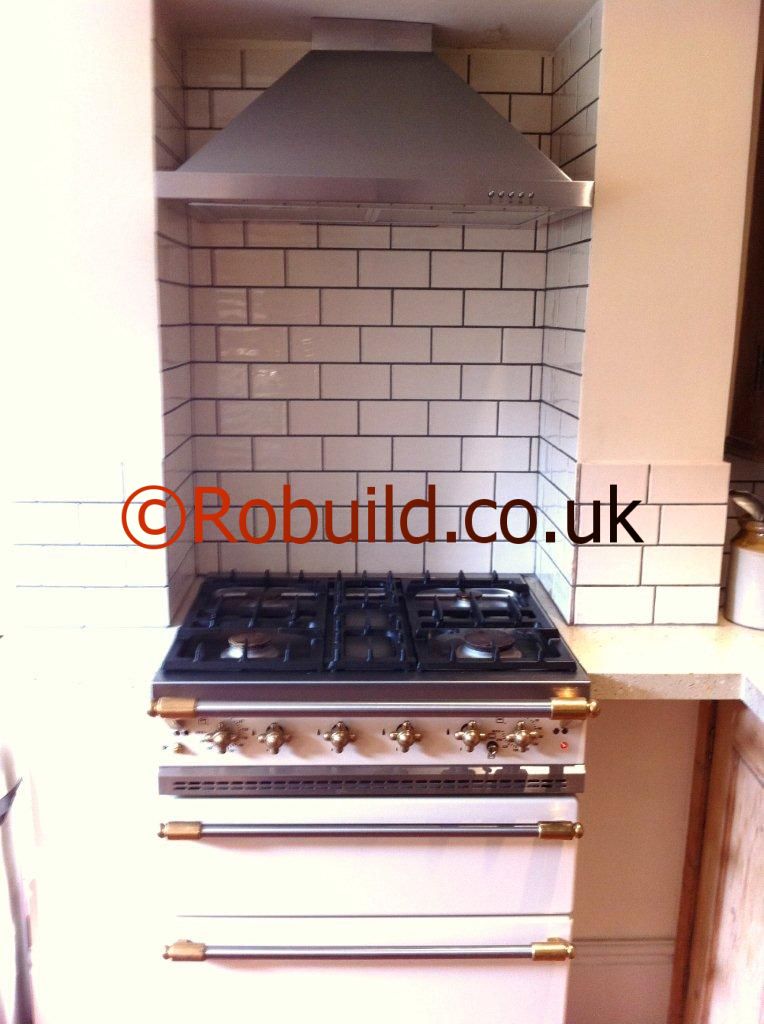
The fireplace can be removed and the hob set into the chimney on a fitted unit with cupboards beneath. The oven can be placed near the serving area or on the other side of the preparation area. The door opening should be taken into account when placing the oven. Also don’t put the cooker by the floor because this can be unsafe especially with small children around.