Screws, nuts and bolts

Screws and bolts provide enormous holding power, but are simple to fix. The types shown here are the ones you are likely to come across when fixing both wood and metal, together with the most commonly used accessories.

Screws – common types

1. Countersunk wood screw.
For general use; head let in flush with wood surface.

2. Pozidriv head countersunk screw. Fixed with special non-slip screwdriver.

3. Raised head countersunk screw. For fixing door-handle plates, etc, to wood; decorative head designed to be seen.

4. Round head screw. For fixing hardware without countersunk holes to wood.

Screws – special use

5. Coach screw.
Extralarge wood screw with square head; tightened with spanner.

6. Self-tapping screw. For sheet metal; cuts its own thread as it is screwed in; has slot, Phillips (cross), or Pozidrive head.

7. Dowel screw.
For invisible fixings; two pieces of wood twisted together to tighten.

8. Handrail screw.
For ‘pocket’ screwing; head screwed on from side with screwdriver.

9. Cup hook and screw eye.
Large number of shapes and sizes available.

Screws – accessories

10. Flat washer.
For round head screws; spreads load to give a strong grip.

11. Screw cup-raised type.
For countersunk or raised head countersunk screws; spreads load, improves appearance.

12. Screw cup-socket type.
For countersunk screws; hammered into pre-drilled hole for a completely flush fixing.

Bolts

13. Machine screw.
Not a screw, but a bolt. Small sizes only; available round, pan, cheese or countersunk heads.

14. Machine bolt.
Large sizes only; available with hexagonal or square heads.

15. Coach bolt.
Large bolt with a ‘square collar under the head that stops it from turning when the nut is done up.

16. Rag bolt.
For bolting wood or metal to concrete; jagged head is set in wet concrete and holds bolt firmly when concrete dries.

Nuts

17. Hexagonal nut.
Commonest type, available in a wide range of sizes.

18. Square nut.
This type available in large sizes only, e.g. for coach bolts.

19. Flat square nut.
Small sizes only; thinner than l8 in proportion to width.

20. Handrail nut.
Used on handrail screw (8) and in other places where nuts have to be tightened from the side in a small space.

21. Wing nut.
Tightened by hand;’for use where nuts must be undone quickly.

22. Domed nut.
Decorative nut, generally chromium plated.

23. Locking nut.
For places where vibration might make nuts undo; has fibre ring inside to make it hard to turn.

Bolts accessories

24. Flat washer.
Same as (10); used in same way; also makes nuts easier to turn.

25. Single coil washer.
For metal fastening only; spring shape prevents bolts from undoing.

26. Internal and external tooth washers. Gripping teeth keep bolts from undoing.

27. Timber connector. Used between pieces of wood bolted together.

Hammers and screwdrivers


Hammers

Club hammer.
Used for general heavy hammering, particularly in building and demolition work. In conjunction with a bolster chisel it is used for cutting bricks, shaping paving stones, knocking through brickwork and so on.

Pin or telephone hammer.
Used for tacks, panel pins, fine nailing and braddling. The wedge shaped end is used for starting small nails while holding them between your fingers.

Warrington or cross pein hammer.
Used for general nailing, joinery and planishing or metal beating.

Ball pein or engineer’s hammer.
Used for metal working. The round end is used for starting rivets, for example. This is the hammer to use for masonry nails as its hardened steel face will not chip.

Scutch or comb hammer.
Used for trimming and shaping common or hard bricks which would damage a brick trowel. The combs can be replaced after wear.

Soft-headed hammer.
Used in metal beating and in general work where it is important not to damage a surface. The soft head also avoids the possibility of a spark setting off an explosion.

Claw hammer.
Used for general purpose carpentry, particularly for driving and removing nails. When taking out nails, make sure the nail head is well into the claw and lever evenly.

Ripping claw hammer.
Used similarly to the claw hammer in work where speed rather than care is essential.

Screwdrivers

Standard slotted screwdriver.
Used for general screwdriving of single slotted screws.

Crosshead screwdriver (Pozidriv or Philips).
Used uith cross slotted screws to provide greater purchase and positive location.

Parallel tip screwdriver.
Used in engineering and otherwise when the screw sits inside a recess of the same width.

Electrical screwdriver.
The insulated handle contains a neon indicator which lights when the blade is touched against a live source. You must ensure that the insulatation is safe for the voltages you intend to check.

Archimedean (or Yankee) spiral ratchet screwdriver.
Used for general purpose screwdriving. Pushing the handle home automatically drives or removes screws. When locked, at length or closed, the ratchet allows screws to be driven or removed without taking the blade from the slot.

The chuck can take blades of different widths and even drill bits.

Double-ended cranked screw-driver
Used for driving awkwardly-placed screws.

Stub screwdriver.
Used in confined spaces.

Masonry and bricklaying tips

Cement mortar can be ‘fattened up’ – made more plastic and easier to lay – by adding a squirt of washing-up liquid to it. This must be a soap liquid, such as Fairy liquid, and not a synthetic detergent.

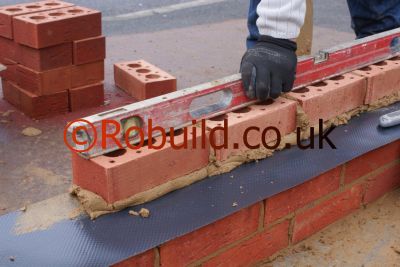
bricklayer building brick wall
When checking that a course of brickwork or other work, is horizontal, ensure that there are no lumps of mortar sticking to the spirit level. Even a small piece would make it inaccurate enough to affect the job. To compensate for any inaccuracy in the level itself, use it once, then turn it end for end and use it again. Do not use a short level for checking a long run.

Never wash cement-covered tools in a plumbed-in sink: the cement will set in the pipe and block it. Wash them in a bucket and empty it where the dried cement won’t show.

South Kensington

We cover South Kensington and Chelsea
Friendly & Professional Building Services:
Kitchens, Bathrooms, Conversions‎, Refurbishments, Renovations,Roofing, Plumbing, Electrical, Landscaping

Call us for a free quote today‎

south kensignton chelsea builders

Structural Engineers

Structural Engineers are not celebrated like the Architects are – because what they do is not a glamorous job. Crunching numbers, loads and weights, resistance and making sure the designs are safe to built – makes them a bit unpopular.

http://www.youtube.com/watch?v=zIlh3dD3StE

Fixing & Supporting heavy weights

Supporting heavy weights

Where very heavy furniture and timber used for construction purposes are to be attached to solid walls, expanded masonry bolts should be used for secure fixing. These are inserted into a suitable hole and, when the bolt is tightened, it draws a plug up into the outer body of the bolt, which then expands and grips the masonry. When positioning the holes, avoid drilling in the mortar between bricks and in the corners of the bricks themselves.

Heavy fixings
Lined walls are obviously weaker than solid ones, and great care must be taken when fixing up heavy objects. If there is too much stress on an unsupported wall board, it could rip away from the studs. To make a secure fixing, locate the timber studs and attach a batten to the surface of the wall. The object can then be screwed to the batten.

Fixings for hollow ceilings and walls

Many interior wall and ceiling surfaces are created by fixing some form of lining, such as plasterboard, to timber supports. The fixings described above, except for the Rawlnut and some nylon plugs, are not suitable for use on these surfaces as they would simply fall out. In some cases, objects can be attached by screws passing through the lining into the timber supports. To locate the position of the studs or joists, tap along the wall or ceiling with a hammer-a ‘dull’ sound will indicate a stud. Before drilling the screw hole, probe with a fine drill or bradawl to confirm you are in the right position. Often, however, the proposed fixing point will not correspond with a timber support (or you may not be able to find them!) and you will have to use a special fixing.

Fixings for hollow surfaces

A large number of fixings are available and all are designed so that some form of support is provided behind the panel when the bolt or screw is tightened. A metal type of fixing is the metal ‘toggle’. These either rely on gravity to open the toggle when the fixing is pushed through the wall, or are spring loaded. Gravity toggles should be used for hollow wall fixings only as they would not spread the load evenly on a ceiling. Spring toggles, however, are suitable for both walls and ceilings. To attach an article with both these fixings, first undo the toggle and then insert the bolt through the object to be fixed.

Attach the toggle to the end of the bolt, fold it flat, and push it through the hole. Once on the other side of the panel, the toggle opens and is drawn against the back of the panel when the bolt is tightened. Unfortunately, these can only be used once, as withdrawing the bolt will cause the toggle to fall into the cavity. This feature also applies to nylon or plastic anchors, which are used with screws instead of bolts. For a more ‘permanent’ type of fixing, a nylon toggle is available that remains in place when the screw is removed. This is made up of a toggle bar, a slotted collar which remains on the outer surface of the panel, and a ridged nylon strip which joins the two. The toggle is first pushed through the wall panel and the collar is slid along the strip into the hole. The strip is then cut off flush with the collar and the screw is inserted. Alternatively, you can use one of the anchor devices with a flange which remains on the outside of the wall to prevent the body of the fixing being lost in the cavity if the bolt is removed.

Fixing for solid walls

builder drilling wall
Solid walls are generally made of either brick, concrete, or lightweight cellular or aggregate building blocks. Attaching objects to brick and concrete is usually straight forward, and a secure fixing can be made with masonry nails or any of the standard types of plug and screw fixings in the case of cellular blocks, an adequate fixing can be made by simply drilling and driving in a screw. Care is needed, however, when fixing to aggregate blocks as these do not provide as secure a bedding as the other materials.

Masonry nails
These can be used to fix such things as shelving battens, picture rails, skirting boards and studs for wall panelling to most types of solid surface in the home. They are tempered to prevent bending and can be nailed straight into the wall with a hammer. Special cartridge tools which fire the nail into the wall can be obtained. These are particularly useful where large quantities of nails need to be driven. Two types of nail are available. One has a straight shank and the other a twisted one, which improves penetration into hard materials and helps keep the nail firmly in place. When nailing, always drive the nail in at right angles to the wall and ensure that the nails are long enough to penetrate at least 13mm and not more than l9mm in into the masonry. If the wall is plastered add the thickness of the plaster to the length of the nail required. To prevent them from snapping, nails with straight shanks should be gently driven into the wall with light hammer blows aimed to hit the head of the nail straight on. With twisted shanked nails, start the nail off with light hammer blows, and then use heavier blows to drive the nail home they are stronger than straight shanked nails and will not break so easily if possible, wear goggles as protection from flying chips of masonry or broken nails.

Wall plugs

Most household objects can be firmly attached to solid walls with one of the many types of plug and screw fixings available. They all require a pre-drilled hole, which can be made with either a hand boring tool or a tungsten carbide-tipped masonry drill. To make a hole with a hand tool, first tap the tool with a hammer through any plaster and then use firmer blows when the masonry is reached. Twist the tool slightly after each blow to ensure a neat hole and to stop it jamming. Once the required depth for the plug has been reached, remove the tool and blow out any dust. If you are using a masonry drill, you must use either a hand brace or an electric drill with a speed reducer. With some drills this is built in but an attachment is available to reduce the revolutions of a fixed speed drill. As you drill, press firmly so that the bit bites into the masonry. Remove it from the hole a few times and clear away any debris. Take care to keep the drill steady or the hole will become larger than required. If this does happen, you will have to pack it with a suitable filler. A percussion drill is desirable for use with concrete as it saves time and wear on the drill bit. This can be hired but, again, an attachment for converting an ordinary drill is available.

Second, the screw shank must never be allowed to enter the plug; this would weaken the fixing and the masonry. If the thickness of the article to be secured is less than the length of the screw shank, sink the plug further into the wall. When the hole has been made, first insert the screw a couple of turns into the plug and then push the plug into the wall. Then tighten the screw until the shank is about to enter the plug. Withdraw the screw, attach the fixture and then screw it up tight. Plastic wall plugs are also available and come either as strips which you cut yourself, or in pre-cut lengths. They have the advantage of being rotproof and waterproof, and are colour coded for size.

Aggregate blocks
The main problem encountered when attaching objects to walls made of aggregate building blocks is obtaining a firm anchorage for the fixing. Although light objects can often be adequately fixed with standard plugs and screws, it is safer to use one of the many nylon plugs designed for the purpose. These have ‘teeth’, or ridges, which grip the surrounding material, and ‘fins’ which prevent the plug rotating while screwing. They will also take screw shanks with little distortion, and can be used in normal masonry. Another device that is useful for fixing to aggregate blocks is the’Rawlnut’. This has a rubber sleeve which, when the bolt is tightened, expands and compresses against the surrounding material. lt can also be used for fixing to other types of masonry and is suitable for hollow surfaces.

Lathing ceilings

Lath can be used as an alternative to plasterboard as a base for ceiling plaster. Various types are available, but the most common are ‘expanded metal lath’ and ‘K-lath’. Wood lath has largely been replaced by these. Expanded metal lath is a metal diamond shaped mesh which is fixed in position with galvanised clout nails, screws or staples. It comes in 2.7m 600mm sheets and can be cut with tin snips. When fixing to the joists, stagger the sheets to avoid long joins, and overlap each about 13mm. Wire any unsupported joins with galvanized wire at frequent intervals. K-lath consists of a mixture of metal wire and paper. It is also cut with snips and fixed with galvanized nails or staples. Wood lath is made up of strips of timber about 1.2m x25mm x6mm. The strips should be nailed about 6mm apart across the joists, and the joints should be staggered wherever possible.

Plastering on lath

Before the normal floating and setting coat, a ‘rendering’ coat has to be applied directly to the lath. If you are using a lightweight finish coat, a plaster such as Carlite Metal Lath should be used. If using this plaster, however, you must use the same material for the floating coat. Using a sanded mix is more complicated, but it does enable you to use a slower-setting finish plaster. To mix a sanded rendering coat, first prepare a lime mortar by mixing three parts of sand and one part of lime with water (use a bucket as a measure). Hair, or a special nylon fibre made for the purpose, should be added to this mix to strengthen the finish mortar. As a guide, if you have used three bucketful of sand and one of lime mix in about one handful of hair or fibre.

Allow this mix to stand for about 24 hours, then mix six parts of it to one part Portland cement. Add water, but only enough to make the mix fairly stiff. When applying the rendering coat, press it on firmly with the laying trowel so that the plaster firmly ‘keys’ with the lath. If you are plastering over wood lath always apply the plaster in the direction of the joists, so that you plaster across the ‘run’ of the lath. Once the lath has been covered to a depth of about 6mm, key the surface well and leave it to set. Now mix your floating coat and lay screeds around the edges of the ceiling with the laying trowel. Rule them in with the featheredged rule. Divide the ceiling into manageable sections with further screeds if required.

Then proceed to fill in the sections and rule them flush with the screeds. Smooth over and key the surface with the devil float, and clean out the corners with the laying trowel. When dry, skim on a thin layer of finish plaster with the steel trowel. Go around the edges first and then apply strips from one side to the other. Follow up with the wood float, using strokes in the same direction. Then put on another layer, this time crossing the previous strips at right angles. With the steel trowel, lay on a final coat and then smooth all over. Clean out the corners where the ceiling meets the walls with the angle trowel and, finally, wash down adjacent plasterwork if required.

Plasterboarding ceilings

plasterboarding ceilings
Red plasterboards are fire rated
Plasterboard consists of a gypsum core sandwiched between paper liners. Various types are designed to take plaster, and it is advisable to read the manufacturer’s instructions regarding fixing and plastering before you start work as there can be small variations to the instructions given below. Most plasterboards, however, have square edges and these need ‘scrimming’, or reinforcing, after the boards are placed in position. Most can also be plastered with one ‘thick’ (about 5mm coat of finish plaster.

The plaster must be a hemi-hydrate. Various sizes of boards are available and it is sometimes useful to obtain a variety to minimize wastage. But as it is easy to cut, one of the standard sizes, say 1.2m x 2.4m (4ft x 8ft) is a convenient size to work with. Plasterboards also come in two thicknesses 9.5mm and 12.5mm. The first is suitable for most situations, but where the distance between the centres of the ceiling joists exceeds about 350mm, the latter should be used. Some ceilings are very uneven and it may be necessary to counter batten them to provide a new level surface on which to nail the plasterboards. The first battens are nailed at any convenient, spacing and are used to form fixing points for a second set of battens which are then fixed at right-angles to the first ones. This second set of battens are fixed at centres to suit the width of the plasterboard and they are levelled by driving thin wooden packing pieces between the battens where necessary.

The ends of the boards can be butted up to the walls or the plaster can be chipped away so that the boards can go right up to the brickwork. In the former method jute scrim is applied to the angle to reinforce the plaster. When flxing the plasterboards to the joists do not use ordinary galvanized clout-head nails as these large, flat heads cut the paper covering of the boards.

If you are not using plasterboard screws, use only the proper plasterboard nails which have a slight bevel underneath the head rather like a countersunk screw head. These small-headed galvanized nails should be 30mm long for 9.5mm thick boards and 40mm long for the 12.5mm boards. Place the nails 12.5mm from the edge and at 150mm centres.

Fixing to the ceiling

plasterboarding ceiling

Plasterboards over which you intend to plaster can normally be nailed either across or along the joists. For large areas it is often desirable to position them in both directions so that long joins, which may cause cracking, are avoided wherever possible. It is particularly important to ensure that the joints are adequately nailed to the joists. You should leave an 3mm gap between the boards for scrimming. Before starting work, it is a good idea to draw a plan of the ceiling and work out roughly how your boards will be placed. This will help you to arrange them to minimize cutting, and also to ensure that they are sufficiently staggered.

If you are working alone you will need the help of a ‘dead man’s hand’ in addition to the normal tools and working platform. This is simply a long piece of straight-edged wood, about 50mm x 25mm to which is fastened a cross piece about 600mm wide. The bottom of the batten rests on the floor and the cross piece is wedged against the plasterboard to hold it in position. Your hands are then free to nail or screw the board to the joists. The easiest way to cut plasterboard is to score the face side deeply with a knife along a straight edge and then lay the board, with the cut side uppermost, over the edge of a table or bench so that the cut is in line with the edge. Snap the core by pressing down sharply, turn the board over and cut the paper on the other side along the crease. Alternatively, you can use an old saw, but this is slower and more tedious.