Builders Building works

Curtain tracks

window curtain bedroom

The extensive range of curtain tracks enables you to choose the type which best suits your room and the curtains you wish to hang. Make sure the track is strong enough to take the weight of the curtains; some plastic track will not be sufficiently sturdy to hold full length curtains, which may have to be hung on metal track. If the track will be visible when the curtains are hung, choose either a decorative track which blends with the room, or a plain. unobtrusive one which you can paint or leave white. Alternatively hide the rail by fitting a pelmet or valance in front of it.

Pelmet tracks
The traditional and still popular I-section track is not very attractive and therefore is mostly used with a pelmet or valance. It can be made from brass, aluminium, plastic or plastic-covered steel. Brackets. which clip into the top section of the track. hold the rail to the wall, window frame or ceiling. The curtain hooks are attached to double-wheel runners (on metal rails) or to nylon gliders (on plastic tracks). Strong enough to support heavy curtains. I-section rail is sufficiently flexible to be bent into tight curves (useful for fitting square bay windows or for forming overlaps). You can buy ready-made wood pelmets (finished in dark walnut, other timber or gilt) with the curtain track ready fitted and corded on a track board; this is attached by metal clips to the front and side assembly.

Non-pelmet tracks
Most modern tracks are designed for use without pelmets or valances. Some of these have the runners concealed in a box section or clipped over a flat rail. Box rails are normally flexible enough to be used in bay windows and recesses and can be bent to a radius as small as 50mm. But if you have to bend the track as tight as this, check with your supplier that the track is suitable. Tracks for use without pelmets are normally made from plastic or aluminium. Apart from a plain track, various finishes are available such as silver or gold coating, wood grain and carved wood. And you can buy ornamental finials (end pieces) which clip onto the track. You can also buy a fluted trim to clip over straight lengths of track to give the impression of a cornice pole. Another type of non-pelmet track is the neat, inconspicuous U-shaped channel, in which gliders slide. Ideal in recessed windows, it blends well with the clean lines of modern decor. Made from plastic or coated aluminium, it can be mounted on the wall or ceiling but is only suitable for straight runs. It is often used with a second track for hanging nets behind heavier curtains.

Cording sets
Available as optional extras with many tracks, these prevent wear and tear on the curtains caused by hand-pulling; even long curtains can be drawn with ease. Many cording sets have a device included in the kit to assist in the overlapping of curtains. You can fit any good corded curtain track with an electric curtain motor and connect it via a conveniently placed two-way control switch to a socket outlet or fused connection unit.

Curtain poles
For straight runs only, the old style curtain or cornice poles are again popular. The simplest design is a stout pole (of wood, plastic or metal with a brass finish) with plain or ornate turned ends mounted on matching brackets. Many modern curtain poles are made in the same styles as the old brass ones, but with easy-running false rings which slide in channels hidden behind the poles. Some poles are telescopic, fitting a range of widths, and they are often supplied with integral cording sets.

Hanging nets
Net or cafe-style half-pane curtains are usually hung on plastic-covered wires pushed through the top hem of the curtains. You can adjust the gathers as required, but it is almost impossible to open the curtains completely; so this method of hanging is really only suitable for curtains which will be left undisturbed. The neat and simple way of fixing plastic-covered curtain wire is by using rings and hooks. The ring screws into the end of the wire and the hook is screwed into the window frame. This can be done by hand, but if the wood is too hard or you want to put the fixing into the wall (if the window frames are metal) you can use a small round head screw instead.

With wall fixing you will have to drill a hole and plug it before inserting the screw. Make sure you leave a 6mm clearance between the screw head and the wall to allow for the ring to be hooked over the screw. Trim the curtain wire with pliers so it is slightly shorter than the width required. This ensures the wire is really tight when hung and the curtain does not sag. Screw the rings into each end of the wire, thread the wire through the top hem of the curtain and stretch the wire across the window, hanging it over the hooks or screws already fixed at each end. The curtain wire does tend to sag, so hang only lightweight curtains. (If you are hanging floor-to ceiling nets, use the neat U-channel track.)

An alternative method of hanging fixed net curtains is to use lightweight curtain rods (wood dowels are ideal) although you will not be able to open the curtains completely. The rods are fixed near the top of the window frame using curtain rod brackets; the cranked version is screwed to the window frame and the straight version is fixed to each side of the window recess (useful for metal window frames).

Repairing Concrete floors

concrete screed floor

Greasy or oily patches on a solid floor in a garage, shed, cellar or kitchen, must be removed before you lay floor coverings. Grease can build up to such a level that it becomes a hazardard, you should apply a concrete paint or a proprietary grease removing solution, which you can buy from motor accessory shops. Scrape the floor to remove as much grease and dirt as possible and brush on grease remover solution until the surface appears thoroughly wet. Leave for up to 15 minutes for the grease to soften and agitate it with a stiff brush from time to time. If necessary, apply more solution until the grease stain takes on a soap-like appearance. Wash with water and brush the floor; repeat the treatment if the stain remains after the floor has dried out.

Dusty concrete
This can be cured with a concrete hardening and dustproofing liquid. Sweep the floor or vacuum it clean if possible – and apply the liquid with a brush, according to manufacturer’s instructions (two coats may be required). You can use a PVA bonding agent diluted with water, but allow the treatment to dry before subjecting it to normal traffic. According to the wear the floor receives, the treatment may have to be repeated every one or two years. If you need a more durable coloured finish for a garage, store or outside WC, you can apply a brush-on floor sealing compound to give a tough, dustproof coating which is impervious to water and oil.

Fixing mirrors

Mirrors play an important part in interior decoration; if they are carefully placed, a small room can be made to look larger and a dark room appear lighter. In every home there is a place where a mirror can be used to great effect in an alcove, behind display shelving. in a recess or covering a door. But remember a mirrored surface will reflect everything which stands in front of it; so avoid overdoing it by placing mirrors on an adjacent or facing wall since the effect might be confusing and not what you expected.

mirror bathroom ensuite

Mirrors
A wide range of mirrors is available, either drilled for screw fixing or undrilled for other methods of fixing. Your glass merchant will be able to supply you with a mirror of almost any shape or size. Any top quality glass, free of imperfections, is suitable for silvering; 6mm float glass is used for most of the larger mirrors. It might be necessary to use a thicker glass for mirror table tops, depending on the size requirements; your glass merchant should be able to advise you. Decide when placing a special order for a mirror whether you will require a screw fixing. If you do. it is worthwhile getting the supplier to do the drilling for you. Large mirrors are expensive and, since the additional charge for drilling is very reasonable considering the overall cost of the mirror, it is best not to risk drilling the holes yourself. All mirrors should have polished edges, unless they are to be set into a hear,y rebated frame, when a clean cut edge will do. Take care when handling cut mirrors with unpolished edges; wear leather gloves since the edges of the glass are razor sharp.

Screw fixing
A drilled mirror can easily be fixed in place, unless the wall surface is uneven; a really badly undulating surface should be covered with a base board of plywood or chipboard, although it is seldom necessary to go to this trouble. First support the base of the mirror flat against the wall in its final fixing position. It is wise to get help at this stage, if only to check the mirror is set at a true vertical on the wall. Once you have established the right position, mark with a pencil through the drilled holes onto the wall behind. Remove the mirror and drill the wall at these points, using the correct size masonry bit and wall plugs for the mirror screws. The screws used have rubber or soft plastic spacers and collars. Various types are available, although the principle is the same with each. The screw passes through a sleeve, which is centred in the hole of the mirror. At the back a spacer washer fits between the mirror and the wall, while a cup washer is placed between the face of the mirror and the countersunk head of the mirror screw. Great care must be taken when tightening the screws; work round them in turn, gradually tightening each one until is head gently squeezes the soft cup washer on the face of the mirror. Check at this stage the mirror is firmly held against the wall. If it is not, don’t tighten the screws further since this will cause the mirror to break. Remove whichever screw is not gripping the mirror firmly, insert packing behind the spacer washer to fill the remaining gap and screw through the packing into the wall. The decorative heads of the screws can then be fitted into the fixing screws to conceal the screw heads and the washers beneath.

Mirror clip fixing
Undrilled mirrors can be mounted on a wall using mirror clips. Several types are available, including corner clips, plastic spring clips and hook-on clips. With the hook-on type the bottom clips are screwed to the wall in accurate alignment, so the bottom of the mirror rests on the upward facing jaws. Check your levels carefully before finally fixing these clips. The upper clips have a long slot in the back plate through which they are screwed to the wall, tightly enough to allow the clip to slide up and down behind the screw head. The mirror is then placed in the bottom clips and pushed flat against the wall, while the downward facing jaws of the upper clips remain in the open position. The upper clips are then slid down so the jaws hold the top edge of the mirror. The mirror can be easily taken down by opening the upper clips and lifting the mirror out of the bottom ones.

Frame fixing
Small mirrors can be framed and backed and hung in position using mirror plates or chains. Larger mirrors can be built into wall fitments and held with facing mouldings and beading. A mirror can also be placed in a sliding frame to provide a mirrored door for a unit.

Screws, nuts and bolts

Screws and bolts provide enormous holding power, but are simple to fix. The types shown here are the ones you are likely to come across when fixing both wood and metal, together with the most commonly used accessories.

Screws – common types

1. Countersunk wood screw.
For general use; head let in flush with wood surface.

2. Pozidriv head countersunk screw. Fixed with special non-slip screwdriver.

3. Raised head countersunk screw. For fixing door-handle plates, etc, to wood; decorative head designed to be seen.

4. Round head screw. For fixing hardware without countersunk holes to wood.

Screws – special use

5. Coach screw.
Extralarge wood screw with square head; tightened with spanner.

6. Self-tapping screw. For sheet metal; cuts its own thread as it is screwed in; has slot, Phillips (cross), or Pozidrive head.

7. Dowel screw.
For invisible fixings; two pieces of wood twisted together to tighten.

8. Handrail screw.
For ‘pocket’ screwing; head screwed on from side with screwdriver.

9. Cup hook and screw eye.
Large number of shapes and sizes available.

Screws – accessories

10. Flat washer.
For round head screws; spreads load to give a strong grip.

11. Screw cup-raised type.
For countersunk or raised head countersunk screws; spreads load, improves appearance.

12. Screw cup-socket type.
For countersunk screws; hammered into pre-drilled hole for a completely flush fixing.

Bolts

13. Machine screw.
Not a screw, but a bolt. Small sizes only; available round, pan, cheese or countersunk heads.

14. Machine bolt.
Large sizes only; available with hexagonal or square heads.

15. Coach bolt.
Large bolt with a ‘square collar under the head that stops it from turning when the nut is done up.

16. Rag bolt.
For bolting wood or metal to concrete; jagged head is set in wet concrete and holds bolt firmly when concrete dries.

Nuts

17. Hexagonal nut.
Commonest type, available in a wide range of sizes.

18. Square nut.
This type available in large sizes only, e.g. for coach bolts.

19. Flat square nut.
Small sizes only; thinner than l8 in proportion to width.

20. Handrail nut.
Used on handrail screw (8) and in other places where nuts have to be tightened from the side in a small space.

21. Wing nut.
Tightened by hand;’for use where nuts must be undone quickly.

22. Domed nut.
Decorative nut, generally chromium plated.

23. Locking nut.
For places where vibration might make nuts undo; has fibre ring inside to make it hard to turn.

Bolts accessories

24. Flat washer.
Same as (10); used in same way; also makes nuts easier to turn.

25. Single coil washer.
For metal fastening only; spring shape prevents bolts from undoing.

26. Internal and external tooth washers. Gripping teeth keep bolts from undoing.

27. Timber connector. Used between pieces of wood bolted together.

Hammers and screwdrivers


Hammers

Club hammer.
Used for general heavy hammering, particularly in building and demolition work. In conjunction with a bolster chisel it is used for cutting bricks, shaping paving stones, knocking through brickwork and so on.

Pin or telephone hammer.
Used for tacks, panel pins, fine nailing and braddling. The wedge shaped end is used for starting small nails while holding them between your fingers.

Warrington or cross pein hammer.
Used for general nailing, joinery and planishing or metal beating.

Ball pein or engineer’s hammer.
Used for metal working. The round end is used for starting rivets, for example. This is the hammer to use for masonry nails as its hardened steel face will not chip.

Scutch or comb hammer.
Used for trimming and shaping common or hard bricks which would damage a brick trowel. The combs can be replaced after wear.

Soft-headed hammer.
Used in metal beating and in general work where it is important not to damage a surface. The soft head also avoids the possibility of a spark setting off an explosion.

Claw hammer.
Used for general purpose carpentry, particularly for driving and removing nails. When taking out nails, make sure the nail head is well into the claw and lever evenly.

Ripping claw hammer.
Used similarly to the claw hammer in work where speed rather than care is essential.

Screwdrivers

Standard slotted screwdriver.
Used for general screwdriving of single slotted screws.

Crosshead screwdriver (Pozidriv or Philips).
Used uith cross slotted screws to provide greater purchase and positive location.

Parallel tip screwdriver.
Used in engineering and otherwise when the screw sits inside a recess of the same width.

Electrical screwdriver.
The insulated handle contains a neon indicator which lights when the blade is touched against a live source. You must ensure that the insulatation is safe for the voltages you intend to check.

Archimedean (or Yankee) spiral ratchet screwdriver.
Used for general purpose screwdriving. Pushing the handle home automatically drives or removes screws. When locked, at length or closed, the ratchet allows screws to be driven or removed without taking the blade from the slot.

The chuck can take blades of different widths and even drill bits.

Double-ended cranked screw-driver
Used for driving awkwardly-placed screws.

Stub screwdriver.
Used in confined spaces.

Masonry and bricklaying tips

Cement mortar can be ‘fattened up’ – made more plastic and easier to lay – by adding a squirt of washing-up liquid to it. This must be a soap liquid, such as Fairy liquid, and not a synthetic detergent.

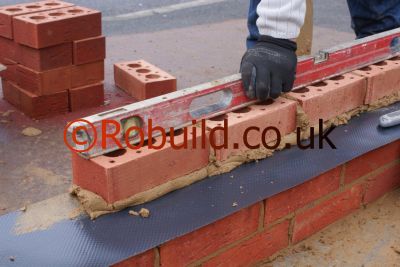
bricklayer building brick wall
When checking that a course of brickwork or other work, is horizontal, ensure that there are no lumps of mortar sticking to the spirit level. Even a small piece would make it inaccurate enough to affect the job. To compensate for any inaccuracy in the level itself, use it once, then turn it end for end and use it again. Do not use a short level for checking a long run.

Never wash cement-covered tools in a plumbed-in sink: the cement will set in the pipe and block it. Wash them in a bucket and empty it where the dried cement won’t show.

South Kensington

We cover South Kensington and Chelsea
Friendly & Professional Building Services:
Kitchens, Bathrooms, Conversions‎, Refurbishments, Renovations,Roofing, Plumbing, Electrical, Landscaping

Call us for a free quote today‎

south kensignton chelsea builders

Structural Engineers

Structural Engineers are not celebrated like the Architects are – because what they do is not a glamorous job. Crunching numbers, loads and weights, resistance and making sure the designs are safe to built – makes them a bit unpopular.

http://www.youtube.com/watch?v=zIlh3dD3StE

Fixing & Supporting heavy weights

Supporting heavy weights

Where very heavy furniture and timber used for construction purposes are to be attached to solid walls, expanded masonry bolts should be used for secure fixing. These are inserted into a suitable hole and, when the bolt is tightened, it draws a plug up into the outer body of the bolt, which then expands and grips the masonry. When positioning the holes, avoid drilling in the mortar between bricks and in the corners of the bricks themselves.

Heavy fixings
Lined walls are obviously weaker than solid ones, and great care must be taken when fixing up heavy objects. If there is too much stress on an unsupported wall board, it could rip away from the studs. To make a secure fixing, locate the timber studs and attach a batten to the surface of the wall. The object can then be screwed to the batten.