Electricians in London

Electricians in London

Smart Home, Home Integrated Systems, security systems, CCTV

Home Control is automating the control of your home and making your life easier and even saving energy. It can be as basic as dimming lights with a remote control or as complex as setting up a network of items in your home (such as a thermostat, security system, lighting and appliances) that can be programmed using a main controller or even with your mobile phone.

Audio Systems
Lighting Control
Data and Telephone
CCTV
Security

Historical Electrical devices with a generation twist

This is one of my favourite photos I have ever taken in 2013 – London.

old electrics London
The beauty of the past

The property is located in Central London and the house owner decided to sell the house. The original electrical wiring was done around 1951 or just about after the end of the second world war 2. I think I have spotted some of the first factory made electrical wiring under the floorboards.I mean the original metal shield cables.

If you collect old electrical stuff like I do, I am sorry. An electrician will throw everything into a skip. But I am the proud owner of the first generation thermostat and a pay by coins – for electricity – machine.

Doorbell with camera and motion sensors

The iDoorCam smartphone app works with a camera mounted to a doorbell
When a visitor presses the bell, the camera begins filming their face
Images are sent wirelessly to the mobile phone so users can see who it is
The user can then see and hear the guest through the Android and iOS app

You can build one of these with the raspberry Pi, a cheap webcam and a few bits taken from an old computer keyboard. For about £35, everything is on the internet so you just need to follow instructions.
The bell’s mechanics should be recessed behind the door and just the button press showing.

Repairing old fuses

When electric current passes through a wire it causes heating: the thinner the wire the greater the heat. Even the thick wire used in domestic wiring will overheat if too much current passes through it and may easily set the house on fire. To prevent this, a fuse is built into every circuit. This is a particularly thin piece of wire which will heat up quickly and melt if a more than safe quantity of current passes through it.
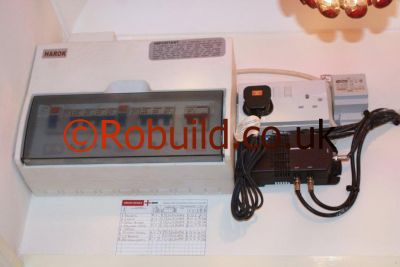
Modern fuse box - Consumer Unit
Modern fuse box – Consumer Unit

Types of fuses
All master fuses one for each circuit are mounted on fuse carriers in a fuse box close to the Electricity Board’s supply meter. There are two main types, rewirable and cartridge, although miniature circuit breakers are sometimes flitted instead of fuses.

Rewirable
This type has fuse wire stretched between two retaining screws on the porcelain or plastic fuse carrier. The wire is available in three ratings – 5, 15 and 30amp and you can usually buy a card of wire carrying a supply of all three.

Cartridge
This type cannot be rewired since the fuse is sealed inside a tube; once it blows the fuse must be replaced. The advantage of the master cartridge fuse is it is impossible to fit the wrong one because each rating has a different size cartridge (as compared to plug fuses that are uniform in size). The fuses are also colour coded so they can be easily recognized: 5amp is white, 15amp blue, 20amp yellow, 30amp red and 45amp green.

Miniature circuit breakers
Used in domestic fuse boxes instead of fuses, these automatically switch themselves off if a circuit is overloaded. When the fault has been corrected the circuit can be reconnected just by resetting the on/off switch.

Why fuses blow
A master fuse will blow if the circuit is overloaded, if the fuse wire is of too low a rating or if a faulty appliance is used with an unfused plug or socket. Before repairing the fuse check you are not using too many appliances on one circuit and make sure you are using the right size fuse for the circuit. If you suspect a faulty appliance, even though it seems to be working adequately, stop using it and call an electrician or contact the manufacturer. Sometimes a fuse blows simply because it is o1d; all you need to do is replace it with a new one of the correct rating. If a fuse still blows alter being replaced, call an electrician.

Don’t try to stop a fuse blowing by putting in a higher rated one.

Tracing faults
If one of your lights goes out see first whether those nearby are still working; if they are it is likely only the lamp bulb has blown. If all your lights are out check whether the street or your neighbours are in darkness too; if they are there is nothing wrong with your fuses – there is a general power failure and you will just have to wait for the power to be restored. If everyone else’s lights are working you have an internal power failure, so turn off the relevant switch before investigating. You will save time and trouble by keeping a small electrical screwdriver, a torch and replacement fuses or fuse wire handy by the fuse box. A supply of candles in the house is also good sense.

Rewiring fuses
Always turn off the mains supply switch before attempting any repairs. If you are really efficient you will have made a numbered plan of the carriers in your fuse box, labelling each one according to the circuit it controls (cooker, downstairs sockets,upstairs lights etc.). This plan should be taped on the inside of the fuse box door so, when investigating a blown fuse, you can pick out the relevant Cartridge fuses carrier first time.

If you have not labelled them you must pull out each carrier in turn to find the blown fuse – look for one which has a broken or melted fuse wire. Undo the screws which clamp the fuse wire in place and remove the remains of the old wire. Stretch a new wire of the correct rating loosely between the screws and wind the ends in a clockwise direction round the screws, which must be carefully tightened until the wire is firmly held. Replace the fuse holder and close the fuse box before reconnecting the supply.

Replacing cartridge fuses
The only way of telling which cartridge fuse has blown is to remove one carrier at a time. Turn off the mains switch, remove a carrier, close the fuse box cover and switch on the mains supply. If everything else continues to work you have found the failed fuse. Take out the cartridge and replace it with a new one of the correct rating, refit the fuse carrier, close the box cover and turn on the main switch.

How to wire up a plug


Houses that have been wired or rewired in Britain since 1947 will be fitted with ring main circuits. These are continuous loops of cable linking all wall sockets. The sockets are uniform 13amp outlets with rectangular holes to take the three flat pins of 13amp plugs. This type of plug is supplied with a 3 or 13amp cartridge fuse (colour coded red and brown respectively). Always fit the fuse recommended by the manufacturer; as a general guide 3amp fuses are used with appliances rated up to 720 watts (for example table lamps) and l3amp fuses are used with larger appliances rated above 720 watts and up to 3000 watts (including kettles, irons and heaters). Some appliances (such as colour televisions, vacuum cleaners and spin dryers) although rated at less than 720 watts require a high starting current and should be used with 13amp fuses. In every case check first with maker’s instructions. Older houses will have radial wiring where separate cables radiate from the fuse board to each socket. These sockets are usually round pin in three sizes. The largest takes a 15amp plug used with larger appliances (such as heaters) while the other sizes take 5 and 3amp plugs used with smaller appliances (drills and table lamps respectively). The outlets may have two or three holes. The two pin sockets are not earthed and should only be used for light fixings with no exposed metal parts or for small double insulated appliances designed to operate without an earth connection and which are supplied only with two core flex. Where possible it is safer to have radial wiring replaced (by your Electricity Board or a registered electrical contractor) with the properly earthed – and safer – ring main circuit. Most plugs are made of tough, hard plastic but special rubberized types are available for equipment likely to be subjected to rough treatment, such as electric drills. Always buy a reputable make of plug because on poorer quality types the pins may move and cause a bad connection.

To fit a plug
First familiarize yourself with the colour code of the flex as it is most important the right core goes with the right terminal. With the new code blue is neutral, brown live and yellow/green earth. On older flex black is neutral, red live and green earth. Remove the cover of the plug by undoing the large screw between the pins. When you look at the plug, with the largest pin (the earth) at the top and the flex outlet at the bottom, the live terminal is on the right (marked L) and the neutral terminal is on the left (marked N). Prepare the flex by removing about 38mm of the outer covering with a knife and fit the flex through the flex grip. This will be either a clamp type secured with two small screws (in which case loosen the screws, thread the flex through the grip and tighten the screws) or a V-shaped grip which holds about 6mm of the flex covering inside the plug. Make sure each core of the flex will reach its terminal, then cut l2mm beyond this for joining to the terminals. With wire strippers carefully remove about l2mm of the insulation at the end of each core and twist the loose strands neatly together. Check which type of terminals the plug has. If it has screw holes double back the wires, insert them into the terminal holes and tighten the terminal screws with a small screwdriver to secure the wires. If the terminals are of the clamp type remove the screws, wrap the wires around the terminal posts in a clockwise direction, replace the screws and tighten them. On some plugs the live terminal is under the fuse housing, in which case you will have to remove the fuse before wiring that terminal. Make sure the plug is neatly wired: the insulation must go right up to the terminals and there must not be any straggling wires. If a fuse is required simply snap the cartridge into the holding clips. Finally double check wires are connected to correct terminals before refitting cover.

If a plug gets hot the terminal screws may have worked loose and need to be tightened. Always replace a cracked plug immediately; never repair it, even temporarily, with insulating tape since there is a considerable risk the casing will come apart as the plug is put into or removed from the socket and you could get an electric shock. It is important to check the flex regularly since the point where it joins the plug is particularly susceptible to breaking and fraying (especially on irons and vacuum cleaners). At first sign of wear cut frayed piece to make new end and rewire plug.

Earthing
When rewiring a plug make absolutely sure the earth wire (yellow/green or green) is properly connected. If it is not you run the risk of an electric shock should the metal casing of an appliance become accidentally live. The only appliances which do not need earthing are double insulated ones supplied with two core flex and mains operated shavers which are intended for use with special shaver sockets.

Joining flex cable

One of the real dangers involving electricity is the joining up of flex, which can be a fire hazard.If you really have to do this job, always use a proper connector and check you have wired it up in the correct way.

Whenever possible avoid joining flex. If you have to, always use a proper connector and never try to join two pieces of flex by twisting the bare wires together and covering them with insulating tape. No matter how careful you are there is always a danger the join may work loose or come apart because it is suddenly stretched. If a join does work loose it can create sparks that may in tum lead to a fire. Among the other hazards, the earth safety lead may become detached in a three core flex join or the essential separation between the live and neutral wires break down, causing a short circuit.

Flex connectors are useful for portable appliances like irons and hairdryers, if you want to use them some distance from a socket. But never use more than one connector on a length of flex and don’t trail it under carpets, up the stairs or across a passageway. Apart from the electrical dangers, there is always the risk someone might trip over it. When you require temporary lighting for a Christmas tree, for example, the flex and connector should be tucked against a skirting board and secured with adhesive tape, never by staples. Before you decide you need to make a connection, consider whether it is easier, possibly cheaper, and certainly safer to buy a longer length of flex and fit it permanently to the lamp or appliance. Alternatively it could be preferable, though more expensive, to have a new power socket flitted, especially if it is for a semi-permanent appliance like a fridge, television or room heater.

Fitting connectors
Proper flex connectors do not only keep the cores separate but the screw terminals keep them securely fixed. Always use the same kind of flexes when making a join; although they need not be the same exterior colour, the amps and number of cores must match – three core must be matched with three core and two core with two core. Only trim sufficient outer insulating sheath and inner insulation to leave the minimum bare wire to enter the connector terminals. Make sure there are no bare strands of wire exposed by twisting together the strands in each core before connecting. Always connect the brown core with brown, the blue with blue and the green/yellow earth with earth and check the plug at the end of the extension flex is correctly wired and fused.

Types of connectors
Three kinds of connectors are available for use in the home. But check which one is most suitable for the type of appliance involved and where it is to be used.

Connector ships
Sometimes called block connectors, they are made of plastic and pairs of screws hold the flex ends. The plastic section can be cut to suit single, two or three core flex, but since the copper wires screw heads are not insulated they are only suitable where they can be protected and insulated, such as inside a table lamp or appliance, or in a plastic box with a screw-down cover.

Insulated flex connectors
These consist of a screwdown plastic cover with screw terminals inside. You buy them to suit the flex and the appliance: 5amp for small lamps and l3amp for most other uses. They are generally designed to accommodate the live, neutral and earth of three core flex but can be used with two core flex.

Insulated detachable flex connectors
Made of rubber or a tough plastic, these are like a self contained plug and socket and strong enough for outdoor use. They are available in 5 and 13amp sizes. You must always fix the ‘male’ or plug part of the connector on the flex leading to the appliance and the ‘female’ or socket half should be connected with the flex end that will be joined to the plug connecting with the mains. If you join them the other way round and they become detached, the part with the pins would be live to the touch – and therefore very dangerous.

Stripping cable & flex

There are certain basic rules you must remember before you start to strip flex or cable for connecting to a plug or appliance or for wiring power or lighting circuits. Remove only sufficient insulation to enable the cores to be connected to the terminals; none of the bared wires should be exposed. Don’t stretch the insulation when stripping or you will weaken the portion remaining on the conductor.Take care not to cut through the insulation of conductors, or through a conductor itself, or you will have to shorten the flex or cable and start again. If you damage a conductor the effective current capacity will be lowered and this could cause overheating. Current capacity will also be reduced if you sever any of the fine strands in a length of flex.

Stripping flex
The two most commonly used flexible cords are circular sheathed and braided circular flex. A third, now largely replaced by circular sheathed flex, is twisted twin non-sheath flex.

Circular sheathed
Measure the length of sheathing to be removed and carefully run a knife round the sheath, making sure not to damage the core insulation. From this point, make a cut along the length of the flex to the end, cutting through to the inner insulation. Remove the sheathing with pliers, leaving the insulated cores exposed. Measure the length of insulation to be removed from each core and carefully take it off with wire strippers. Always twist the bared ends of each core together to ensure there will be no stray whiskers to cause a short circuit when the conductors are inserted in their terminals.

Circular braided
Measure the length of braiding to be removed and cut it off with a sharp knife. Trim off the frayed edges and any textile fillers inside the braid and slip a rubber sleeve over the end to prevent further fraying. Strip the required length of insulation from each core and twist the wires together as before.

Twisted twin
Since this type has no sheathing, you only need to strip insulation and twist the cores together.

Stripping cable
The method for stripping cable is basically the same as for stripping flex, but you must take extra care not to damage the conductors since cable is expensive to replace.

Sheathed
Measure and strip off the required amount of sheathing using a knife and pliers as previously described. Strip off the insulation from each wire and slip a length of green (or green/ yellow) PVC sleeving over the end of the earth wire. With the smallest cables (1.0 and l.5sq mm). double the bared ends to provide greater contact area in the terminals. Cables of 4sq mm and above have stranded conductors and the ends must be twisted together with pliers.

Non-sheathed single core
An example of this is the green/yellow PVC insulated earth cable; simply remove the insulation with wire strippers as described above.

Working with electricity

electrician
Simple electrical jobs in the home can be tackled safely and will save hours of inconvenience while you wait for the electrician to call. There is plenty of advice on how to replace a fuse and the safe way to join it. When you an electrical fitting or appliance breaks down, you can have it working in minutes by fitting the fuse plug on yourself. And when you are plunged into darkness because of a blown fuse, you can replace it immediately – and save your candles for the next power failure. Follow carefully the instructions and safety warnings and you should have no fear of getting it wrong.

Recessing fittings and cables

When new socket outlets have to be fitted or wiring extended along walls or ceilings, the electricians will have to cut a channel in the plaster to conceal the cable. They will also have to chop out some of the brickwork to house the steel box for the socket. The electricians will cut through the plaster cleanly with a sharp cold chisel (or fit a specially designed router to an electric drill and work at slow speed), making the grooves and openings as wide as necessary. Chopping through the brickwork with a sharp brick bolster, making the hole deep enough for the front edge of the box to lie flush with the wall surface. Screwing the box into position, feed in the cable and fill any surrounding gaps with plaster or cellulose filler, finishing the surface as before.
rewiring socket wall plaster chasing
When the electricians have made the necessary repairs,they can then connect up the socket and screw it onto the box. Plastering large areas is physically demanding work best left to a skilled professional,who can apply large amounts of plaster before the mixture begins to harden. If you employ a contractor to insert a new damp proof course, an estimate for replastering internal walls should be included if hacking away old plaster is involved.