Professional Romanian plumbers in London, UK. Call 07725055560 for further information. Romanian Plumbing and Heating retailer in London.
Online Plumbing Shop Acton – plumbingshop.org.uk

Professional Romanian plumbers in London, UK. Call 07725055560 for further information. Romanian Plumbing and Heating retailer in London.
Online Plumbing Shop Acton – plumbingshop.org.uk
Central Heating Finchley Plumbers in Finchley
London plumbers Robuild, offer a complete plumbing service in Finchley area for all your plumbing needs. Central Heating, Boilers repairs and installation, Underfloor Heating, Mobility bathrooms, Bathrooms, Kitchens, Showers, Wet Rooms,Gas appliances, new bathrooms, Megaflow Plumbing System,Combination boilers, Boiler servicing.

Our plumbers are Gas Safe registered ( also known as Corgi ) We also cover Woodside Park area. Our builders, painters & decorators, electricians, gardeners and carpenters cover North London and Finchley – Woodside Park area.
Plumbing pipes
When lead and steel pipes went out of fashion and copper and plastic came in, it became possible for householders to tackle simple alterations and repairs to the domestic water supply. For plastic tubing there is only one technique to learn: how to join tubes. Plastic won’t bend far with safety, so any bends are best made by using angle fittings . For copper tube you need to learn how to make joints and how to bend tubes. All the techniques are simple, but it’s best to order an extra length of tube and an extra fitting or two and practise before you tackle the real thing.
Copper tubing and how to bend it into shape
If copper tube is bent more than a small amount it will become oval in section and eventually flatten completely. To avoid this, plumbers use bending springs or bending machines which keep the tube section round. Bending machines are
not worth buying, but you can hire them. Springs can be bought or hired; they are steel spirals about 2ft. long. The easiest kind to use fits round the outside of the tube – it’s easier to slip on to the correct position and take off again after bending. Internal springs which slip inside the tube are more commonly available.
With the spring in place you simply grip the two ends of the tube, set your knee against the place to be bent, and pull. With the tube bent, internal springs tend to jam inside. If the bend is at the end of a tube, so that part of the spring is sticking out, slip a screwdriver into the ring on the spring end, twist to wind up the spring a little and the spring will slip out.
If the bend is in the middle of a long tube you’ll have to fasten the spring ring to a strong wire, measure carefully and mark the wire so that you can slide it in to the right position. Bend the tube a little further than you need, then straighten it a little to release the bending spring.
Copper tube bends easily; thicker tubes can be bent by fitting into a hole bored in a piece of timber; press down on the ends.
For smaller tubes, it is enough to hold ends of tube in each hand and bend tube over your knee. Section to be bent must be protected by bending spring or it will flatten and finally collapse.
Bending machines, usually on hand held or on a portable stand, can be hired, make tube-bending easy. The tube is held in a groove so it can’t flatten while being bent.
Copper or plastic pipes full water are heavy and will sag not supported by fittings.
Plastic pipes: for waste, hot and cold water only
Plastic pipes are for hot water, cold water and waste pipes only. They can be bent cold; the manufacturers supply instructions for bending after heating them, but it’s best, where possible, to use the various angle fittings.
Water supply pipes are joined with solvent cement after cleaning the inside of the fitting and outside the end of the pipe with special cleaning fluid. Buy both when you buy the pipes and fittings. The tube ends must be cut square; use a fine-toothed saw, and chamfer the end with a file. After cleaning, paint outside of tube and inside of fitting
with solvent cement, and immediately push pipe into fitting and allow to set. (Work fast or cement will dry before you’ve made the joint.) Wipe off the surplus cement, and wash out the brush immediately in the cleaning fluid. Bigger pipes for waste systems can be joined in the same way, or they can be joined with simple push-on fittings. These have rubber rings inside which grip the outside of the pipes. Cut pipes square, chamfer the ends
Wipe the outside of the pipe with liquid soap. Check that the rubber inserts are seated correctly in their recess in the fitting. Push the pipe home carefully so that it doesn’t displace the rubber ring. Plastic pipes should be kept an inch or so clear of hot pipes if they are running side by side; if they must be close, they should have insulation between them.
Solvent-cement jointing for plastic waste water pipes or for plastic waste pipes. For plastic waste pipes only: pipes push into expansion fittings where rubber inserts seal the joints.
Push Fit pipes and fittings , also called Polypipe or Speedfit are easiest way to work with pipes. DO NOT USE THEM FOR GAS.

You need a plastic pipe cutter, 15mm and 22mm and when you connect them, make sure you don’t damage the internal rubber ring from the fittings. It is used for underfloor heating installations.
Professional plumbers and architects, sometimes avoid using the Polypipes pipes in favour for the more traditional and proved to last longer: copper pipes.

Capillary fittings: the neatest joints
Capillary fittings make the neatest joints and are the only ones for fitting underground which we’d recommend an
amateur to tackle. The design is such that even if you aren’t good at soldering you’ll be able to make a sound joint. There are two kinds of capillary fittings; those where you must add solder and those, easiest for amateur use, which have a ring of solder already fitted inside as an integral part of the fitting.
Cut the ends square of the two tubes to be joined (use a finetoothed hacksaw or miniature hacksaw) and file off any roughness (use a round file for inside).
Thoroughly clean inside of fitting and outside of tube with glasspaper, plumber’s steel wool or the special cleaning tools.
Put flux on outside of tubes and inside of fitting. Push tube into fitting as far as the built-in stop.
Scratch tube with nail at joints to be sure solder grips well. Play the flame of blow-lamp on fitting; solder will melt and creep up the narrow space between tube and fitting (by capillary attraction, hence the name) until you see a bright ring of solder all round the joint.
Compression joints are the simplest for copper
Compression joints are the simplest for joining copper tube; there’s no heating or soldering and the only tools needed
are a hacksaw, file and spanners.

Cut square the ends of tubes and file off any roughness (use a round file to smooth the inside). Slide the nut on the tube, then the compression ring. Push tube into the fitting making sure it reaches the stop ridge inside. Then push the ring into the mouth of the fitting, and tighten as far as you can with your fingers. Use a spanner to give nut another quarter or half turn. Don’t over tighten or the joint may leak. This kind of joint is called non-manipulative; make sure you get the right kind of fittings. There’s a similar looking manipulative joint,which needs a special tool to widen tube ends before joining – not quite so easy for amateurs.
If a joint leaks, tighten a little more with spanner; if that doesn’t cure it, remake the joint with a new compression ring.
Adapters
If your existing plumbing is in lead, you’ll have to pay a plumber to make a lead-to copper joint, and you pick up the job from there. He’s likely to charge you fairly steeply, to make up for this work he’s losing, but you’ll still save money in the end. If your plumbing is in steel tube, unscrew a convenient joint and fit a steel-to copper adapter or T-piece. You can buy these adapters from a plumber’s merchant; buy some PTF tape as well, wrap the steel
thread with the tape, then screw on the adapter and from there on you can work in copper tube. Similar adapters are made for steel to-plastic, permitted only for cold water, hot water and waste pipes.
Underfloor Heating Installation
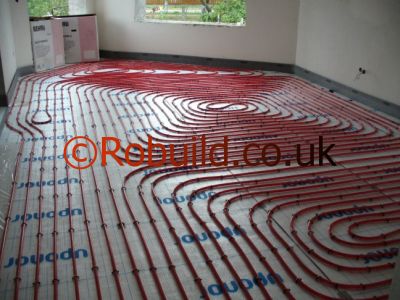
Doing away with radiators is not a luxury anymore, underfloor heating is becoming the norm in London. More than 10 years ago, underfloor heating used to be installed in bathrooms and kitchens, nowadays, it is installed for the whole property, house or flats, bedrooms, living rooms, hallways, no matter the size or types of flooring. Underfloor heating can be installed under carpets, floor tiles, wooden flooring, etc.
With proper insulation and if installed correctly, it can be energy efficient too. Having underfloor heating will give you more space and a better interior design, plus, the heating is dispersed in an uniformed way, no more too hot or too cold room temperatures. The underfloor heating can also be appreciated when walking barefooted on the floors.

The underfloor heating can be controlled by thermostats and programmers, each room independently from each other if needed.The plumbers will explain to you how it works and how many zones you need for a house or a flat.

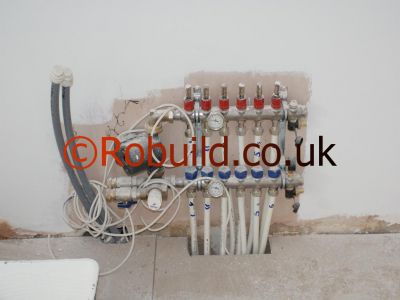
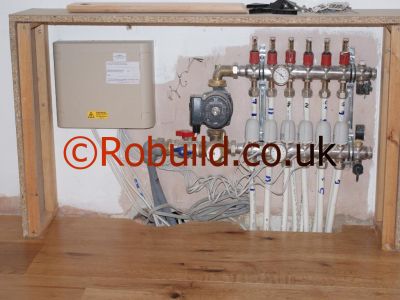
Manifolds will need to be installed too, depending on how many zones are you going to have. The heat output (BTU) is calculated by the manufactures, using special software.

The boiler needs to be adapted and sometimes changed if its not powerful enough. Our London Plumbers will give free advice regarding your Central Heating.
Underfloor Heating Installers in London